Archive for the ‘FIRST’ Category

Integrated subproject sites on readthedocs.org

Saturday, January 14th, 2017

This has been bothering me for a few years now, but in the FAQ for readthedocs it calls out the celery/kombu projects as an example of subprojects on RTD. And.. ok, I suppose it’s technically true, they are related projects, and they do use the subprojects. But if you didn’t know that kombu existed, you’d never be able to find it from the celery project. But they aren’t good examples, and as far as I can tell, no large project uses subprojects in an integrated/useful/obvious way.

Until I did it in December, anyways.

Now, one problem RobotPy has had is that we have a lot of subprojects. There’s robotpy-wpilib, pynetworktables, the utilities library, pyfrc… and until recently each one had it’s own unique documentation site, and there was some duplication of information between site. But it’s annoying, because you have to search all of these projects to find what you want, and it was difficult to discover new related content across projects.

However, I’m using subprojects on RTD now, and all of the subproject sites now share a unified sidebar that make them seem to be one giant project. There are a few things that make this work:

  • I automatically generate the sidebar, which means the toctree in all of the documentation subproject sites are the same.
  • They use intersphinx to link between the sites
  • But more importantly, the intersphinx links and the sidebar links are all generated based on whether not the project is ‘stable’ or ‘latest’.

The last point is really the most important part and requires you to be a bit disciplined. You don’t want your ‘latest’ documentation subproject pointing to the ‘stable’ subproject, or vice versa — chances are if the user selected one or the other, they want to stay on that through all of your sites. Thankfully, detecting the version of the site is pretty easy:

# on_rtd is whether we are on readthedocs.org, this line of code grabbed from docs.readthedocs.org
on_rtd = os.environ.get('READTHEDOCS', None) == 'True'

# This is used for linking and such so we link to the thing we're building
rtd_version = os.environ.get('READTHEDOCS_VERSION', 'latest')
if rtd_version not in ['stable', 'latest']:
    rtd_version = 'stable'

Then the intersphinx links are generated:

intersphinx_mapping = {
  'robotpy': ('http://robotpy.readthedocs.io/en/%s/' % rtd_version, None),
  'wpilib': ('http://robotpy-wpilib.readthedocs.io/en/%s/' % rtd_version, None),
}

And  as a result, they point to the correct version of the remote sites, as do the sidebar links.

While this approach may not work well for everyone, it has worked really well for the RobotPy project. Feel free to use this technique on your sites, and check out the RobotPy documentation site at robotpy.readthedocs.io!
Better python interface to mjpg-streamer using OpenCV

Friday, April 3rd, 2015

The FIRST Robotics Team that I work with decided to install two cameras on the robot, but it took awhile for us to figure out the best way to actually stream the camera data. In previous years, we had used Axis IP cameras — but this year we had USB cameras plugged into the control system. Initially we used some streaming code that came from WPILib, but it wasn’t particularly high performance. Then we heard of someone who was using mjpg-streamer, which sounded exactly like what we wanted to use!

Of course, we needed to connect to the stream from python 3. I looked around, and while there were some examples, they didn’t perform quite as well as I would have liked. I believe if you compile with OpenCV with ffmpeg, it has mjpg support builtin, but it was quite laggy for me in the past. So, I wrote a reasonably efficient python mjpg-streamer client — in particular, I partially parse the HTTP stream, and reuse the image buffers when reading in the data, instead of making a bunch of copies. It works pretty well for us, maybe you’ll find it useful the next time you need to read an mjpg-streamer stream from your Raspberry Pi or on your FRC Robot!

I’m not going to explain how to compile/install mjpg-streamer, there’s plenty of docs on the web for that (but, if you want precompiled binaries for the roboRIO, go to this CD post). Here’s the code for the python client (note: this was tested using OpenCV 3.0.0-beta and Python 3):

import re
from urllib.request import urlopen
import cv2
import numpy as np

# mjpg-streamer URL
url = 'http://10.14.18.2:8080/?action=stream'
stream = urlopen(url)
    
# Read the boundary message and discard
stream.readline()

sz = 0
rdbuffer = None

clen_re = re.compile(b'Content-Length: (\d+)\\r\\n')

# Read each frame
# TODO: This is hardcoded to mjpg-streamer's behavior
while True:
      
    stream.readline()                    # content type
    
    try:                                 # content length
        m = clen_re.match(stream.readline()) 
        clen = int(m.group(1))
    except:
        return
    
    stream.readline()                    # timestamp
    stream.readline()                    # empty line
    
    # Reallocate buffer if necessary
    if clen > sz:
        sz = clen*2
        rdbuffer = bytearray(sz)
        rdview = memoryview(rdbuffer)
    
    # Read frame into the preallocated buffer
    stream.readinto(rdview[:clen])
    
    stream.readline() # endline
    stream.readline() # boundary
        
    # This line will need to be different when using OpenCV 2.x
    img = cv2.imdecode(np.frombuffer(rdbuffer, count=clen, dtype=np.byte), flags=cv2.IMREAD_COLOR)
    
    # do something with img?
    cv2.imshow('Image', img)
    cv2.waitKey(1)


Connect to RoboRIO USB on Linux

Saturday, January 3rd, 2015

We got our RoboRIO imaged today, and my first thought was whether I could use it on Linux without needing to plug it into a network. Turns out, this is a pretty simple thing to do!

  1. Plug the RoboRIO in to your computer
  2. Identify the network device, it should be something like enp0s29u1u2
  3. Assign it an IP address like so:
    sudo ip addr add 172.22.11.1/24 dev enp0s29u1u2

Now you need to start an DHCP server to give it an address, because FIRST didn’t give it a static address for some reason. You could modify the configuration on the RoboRIO… but let’s assume you don’t want to do that. Instead:

  1. Download this python script that acts like a DHCP server
  2. Run this:
    sudo python simple-dhcpd -a 172.22.11.1 -i enp0s29u1u2 -f 172.22.11.2 -t 172.22.11.2

And that’s it! When it works, you should get a message that says “Leased: 172.22.11.2”.

If it’s not working, here are some things to watch out for:

  • Make sure your firewall allows port 67 on UDP
  • Make sure dnsmasq or some similar program isn’t listening on port 67 (use “netstat -ln | grep 67” to check)

Things that would be nice to change:

  • It’d be nice if FIRST changed the usb0 device to have a static address instead of depending on dhcp
  • Probably should create a udev rule to make the network device something pretty
  • When you disconnect the device, you have to run the scripts again. Probably should set something more permanent up, but this is good enough for now

Hope this helps you out!

Award Winning FIRST Robotics Robot Control Interface

Monday, April 8th, 2013

KwarqsDashboard is an award-winning control system developed in 2013 for FIRST Robotics Team 2423, The Kwarqs. For the second year in a row, Team 2423 won the Innovation in Control award at the 2013 Boston Regional. The judges cited this control system as the primary reason for the award.

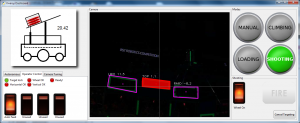
It is designed to be used with a touchscreen, and robot operators use it to select targets and fire frisbees at the targets. Check out the shiny screenshot below:

Kwarqs Dashboard ScreenshotThere are a lot of really useful features that we built into this control interface, and once we got our mechanical and electrical bugs ironed out the robot was performing quite well. We’re looking forward to competing with it at WPI Battle Cry 2013 in May!  Here’s a list of some of the many features it has:

  • Written entirely in Python
    • Image processing using OpenCV python bindings, GUI written using PyGTK
    • Cross platform, fully functional in Linux and Windows 7/8
  • All control/feedback features use NetworkTables, so the same robot can be controlled using the SmartDashboard instead if needed
    • SendableChooser compatible implementation for mode switching
  • Animated robot drawing that shows how many frisbees are present, and tilts the shooter platform according to the current angle the platform is actually at.
  • Allows operators to select different modes of operation for the robot using brightly lit toggle switches
  • Operators can choose an autonomous mode on the dashboard, and set which target the robot should aim for in modes that use target tracking
  • Switches operator perspective when robot switches modes
  • Simulated lighted rocker switches to activate robot systems
  • Logfiles written to disk with errors when they occur

Target acquisition image processing features:

  • Tracks the selected targets in a live camera stream, and determines adjustments the robot should make to aim at the target
  • User can click on targets to tell the robot what to aim at
  • Differentiates between top/middle/low targets
  • Partially obscured targets can be identified
  • Target changes colors when the robot is aimed properly

Fully integrated realtime analysis support for target acquisition:

  •  Adjustable thresholding, saves settings to file
  • Enable/disable drawing features and labels on detected targets
  • Show extra threshold images
  • Can log captured images to file, once per second
  • Can load a directory of images for analysis, instead of connecting to a live camera

So, as you can see, lots of useful things. We’re releasing the full source code for it under a GPL license, so go ahead, download it, play with it, and let me know what you think! Hope you find this useful.

A lot of people made this project possible:

  • Some code structuring ideas and PyGTK widget ideas were derived from my work with Exaile
  • Team 341 graciously open sourced their image processing code in 2012, and the image processing is heavily derived from a port of that code to python.
  • Sam Rosenblum helped develop the idea for the dashboard, and helped refine some of the operating concepts.
  • Stephen Rawls helped refine the image processing code and distance calculations.
  • Youssef Barhomi created image processing stuff for the Kwarqs in 2012, and some of the ideas from that code were copied.

The included images were obtained from various places:

  • Linda Donoghue created the robot image
  • The fantastic lighted rocker switches were created by Keith Sereby, and are distributed with permission.
  • The green buttons were obtained via google image search, I don’t recall where

Download it on my FRC resources page!

Winpdb Remote Debugger for Python ported to RobotPy on vxWorks

Tuesday, January 11th, 2011

I’m really excited about the idea of using python on our FIRST Robotics Team’s Robot this year, and one of the first things that got really annoying was the lack of debugging capability, since vxWorks doesn’t really have a console (I mean it does, but in the way that FRC has it setup, its not really a console in the traditional sense of the word). So I searched around and found Winpdb, a pretty neat remote debugger for python. So after playing with it for a bit, I’ve got it working on RobotPy and it seems to do the trick so far. 🙂

I’ll be creating some other tools as needed, so watch for more python in the future!

Download: http://www.virtualroadside.com/FRC/

cRio Netconsole implemented in Python

Friday, November 12th, 2010

The FIRST Robotics Competition uses the NI-cRio platform for the controller for the robots in the competition. There is a bit of functionality called ‘NetConsole’ which sends the stdout from vxWorks out to a waiting client (refer to the WPI FIRST website for instructions to enable this). It turns out that the protocol used to implement the NetConsole for the cRio is incredibly simple… it just sends the raw output data as a bunch of UDP packets out to the broadcast address on port 6666 (which I suppose is slightly amusing). Here’s a dirt-simple python script that catches the output (TODO: need to send it input… haven’t gotten around to looking at that yet).

#!/usr/bin/env python

import socket
import select

UDP_PORT=6666

sock = socket.socket( socket.AF_INET, socket.SOCK_DGRAM, socket.IPPROTO_UDP )

sock.setsockopt(socket.SOL_SOCKET, socket.SO_REUSEADDR, 1)
sock.setsockopt(socket.SOL_SOCKET, socket.SO_BROADCAST, 1)
sock.bind( ('',UDP_PORT) )
sock.setblocking(0)

while True:
    result = select.select( [sock], [], [] )
    msg = result[0][0].recv( 8196 )
    print msg

Changing variables using a web interface and embedded HTTP server

Tuesday, April 21st, 2009

When walking around during the Boston Regional, I had been talking to some people about code, and they mentioned that LabView was great because they could tune their PID controllers on the fly while the robot was operating. So I thought to myself, “why can’t I do this with C++?”. And… so I did. WebDMA was created to allow our FIRST Robotics team to tune our robot in an easy to use and intuitive way via any modern web browser.

Using C++ operator overloading, WebDMA provides proxy objects that your application can use as normal variables which can be manipulated or displayed by your application via a configurable jQuery/javascript powered Web 2.0 interface hosted by an lightweight embedded web server.

Despite that WebDMA was specifically created for use in FIRST Robotics on the NI-cRio/vxWorks platform, it uses the Boost ASIO portable networking library and Boost Thread portable threads library and is usable on any platform supported by these Boost libraries (tested on Boost 1.38, requires a patch for vxWorks).

A non-functional (but very shiny) demo of the interface is available at http://www.virtualroadside.com/botface/index.html

Visit the Google Code project site for WebDMA

Update: Go here for a video: http://www.virtualroadside.com/blog/index.php/2009/04/25/webdma-demo-video/

WPILib Test Harness Released!

Saturday, March 14th, 2009

So after *far* too much time spent on this, I am happy to announce the release of my WPILib Test Harness! For those who aren’t aware, WPILib is the name of the C++ library that FIRST gives to FIRST Robotics Teams to control the robots. The control system is a PowerPC running on a cRio platform designed and produced by National Instruments.

It had occurred to me towards the end of the build season this year that it was really annoying that I could only easily test code while our team was meeting, and of course I stay up late (as evidenced by this post time). So I wrote some stubs, but at some point I realized it would just be easier to make a giant stub for WPILib, since its just a set of classes with some hardware interfaces. It was extremely useful, and as I evolved it I was even able to find bugs in WPILib and the program for our bot.

At some point I decided to bring it in the direction that it is now, and I’ve spent the last week adding things and making the GUI a bit shinier. I’m pretty happy with the results so far, but theres a long way to go before every bot program will run under it. There’s a lot of things that do work, but there’s also a lot of things that don’t work.
(more…)

Swerve Drive Model Spreadsheet

Monday, March 9th, 2009

Our robot this year uses a ‘swerve drive’ mechanism, with 4 independently steerable wheels. I wasn’t quite sure exactly of the best way to describe the robot’s motion in terms of basic parameters (speed, heading, rotation) , so I went google searching. I found a PPT by Ian Mackenzie talking about different types of omnidirectional drive systems, and it was extremely helpful.

After thinking about it some more,  I created this spreadsheet to help describe the motion parameters to the students I was working with. Its pretty sweet — it uses scatter plots to show the angle of each wheel and the ideal velocity to obtain the motion desired based on the speed/rotation/angle parameters of the overall robot motion. The implementation in C++ was straightforward after that, and it worked out extremely well (unfortunately there is the whole issue of controlling it intuitively with a joystick… we haven’t quite got that down yet).

Download it at my FRC resources download page

FRC Driver Station Test Program

Sunday, March 8th, 2009

This is another resource that I’ve created for the Kwarqs FIRST Robotics team this season that I’ve found useful, and hopefully others will find it useful as well.

This particular program is stupidly simple, but really nice to have around in case you think your driver station is being screwy, or you want to verify that your switches work *before* running your actual code on it (not that you would run something without testing it, right? 😉 ). As you can see from the code, it displays the driver station inputs on the LCD panel of the driver station. It uses a modified version of the DriverStationLCD class posted at http://thinktank.wpi.edu/article/144

(more…)