Archive for the ‘python’ Category

Integrated subproject sites on readthedocs.org

Saturday, January 14th, 2017

This has been bothering me for a few years now, but in the FAQ for readthedocs it calls out the celery/kombu projects as an example of subprojects on RTD. And.. ok, I suppose it’s technically true, they are related projects, and they do use the subprojects. But if you didn’t know that kombu existed, you’d never be able to find it from the celery project. But they aren’t good examples, and as far as I can tell, no large project uses subprojects in an integrated/useful/obvious way.

Until I did it in December, anyways.

Now, one problem RobotPy has had is that we have a lot of subprojects. There’s robotpy-wpilib, pynetworktables, the utilities library, pyfrc… and until recently each one had it’s own unique documentation site, and there was some duplication of information between site. But it’s annoying, because you have to search all of these projects to find what you want, and it was difficult to discover new related content across projects.

However, I’m using subprojects on RTD now, and all of the subproject sites now share a unified sidebar that make them seem to be one giant project. There are a few things that make this work:

  • I automatically generate the sidebar, which means the toctree in all of the documentation subproject sites are the same.
  • They use intersphinx to link between the sites
  • But more importantly, the intersphinx links and the sidebar links are all generated based on whether not the project is ‘stable’ or ‘latest’.

The last point is really the most important part and requires you to be a bit disciplined. You don’t want your ‘latest’ documentation subproject pointing to the ‘stable’ subproject, or vice versa — chances are if the user selected one or the other, they want to stay on that through all of your sites. Thankfully, detecting the version of the site is pretty easy:

# on_rtd is whether we are on readthedocs.org, this line of code grabbed from docs.readthedocs.org
on_rtd = os.environ.get('READTHEDOCS', None) == 'True'

# This is used for linking and such so we link to the thing we're building
rtd_version = os.environ.get('READTHEDOCS_VERSION', 'latest')
if rtd_version not in ['stable', 'latest']:
    rtd_version = 'stable'

Then the intersphinx links are generated:

intersphinx_mapping = {
  'robotpy': ('http://robotpy.readthedocs.io/en/%s/' % rtd_version, None),
  'wpilib': ('http://robotpy-wpilib.readthedocs.io/en/%s/' % rtd_version, None),
}

And  as a result, they point to the correct version of the remote sites, as do the sidebar links.

While this approach may not work well for everyone, it has worked really well for the RobotPy project. Feel free to use this technique on your sites, and check out the RobotPy documentation site at robotpy.readthedocs.io!
BPM autodetection using python + GStreamer’s bpmdetect plugin

Sunday, August 16th, 2015

I recently found the bpmdetect element in GStreamer, and thought it would be neat to try it out and see how well it works. The GStreamer bpmdetect plugin is mostly undocumented, so I had to dig in the source code to figure out how to extract tags from it. The operation is pretty simple:

  • Setup a pipeline to read in a file, put a fakesink at the end of the pipeline and set ‘sync’ to false
  • Insert the bpmdetect element
    • However, due to this bug, insert a capsfilter before the element to mix it down to a single channel!
  • Attach a message handler, and listen for taglist messages
    • If you already have the BPM tag on the file, then it will be emitted by whatever is decoding the audio too. So, what I do is look for messages that *only* have the beats-per-minute tag in the tag list
    • The bpm is accumulated, so the last BPM message you get will be the calculated rate

Pretty simple! Of course, the results are only as reliable as libsoundtouch’s BPM detection is… but it seems to be correct at least some of the time. Expect to see this code in Exaile soon as a companion to the manual BPM counter! 🙂

Code is available in a gist on github: https://gist.github.com/virtuald/c30032a5b8cdacd1a6c0

GTK3 Composite Widget Templates for Python

Sunday, May 24th, 2015

Recently, the other developers of the Exaile audio player and I decided to finally migrate to GTK3 and GStreamer 1.x. I mentioned that I wanted to use some code I had developed a few years ago to get rid of the manual UI building code that we had and replace it with GtkBuilder XML files, and @mathbr noted that GTK had added a new feature called ‘composite widget templates’ a few years ago. The ideas were similar to mine, and reading the comments in a blog post about the Vala implementation inspired me to create a working version of this for Python. The first implementation took a few hours, and I’ve been adding improvements ever since as I’ve been integrating this into Exaile.

Here’s how the vala demo code from that blog post looks like in Python, turns out it’s not *that* different:

from __future__ import print_function
from gi.repository import Gtk
from gi_composites import GtkTemplate

@GtkTemplate(ui='mywidget.ui')
class MyWidget(Gtk.Box):

    __gtype_name__ = 'MyWidget'
    
    entry = GtkTemplate.Child()

    def __init__(self, text):
        super(Gtk.Box, self).__init__()
        self.init_template()
        self.entry.set_text(text)
    
    @GtkTemplate.Callback
    def button_clicked(self, widget):
        print("The button was clicked with entry text: %s" % self.entry.get_text())

    @GtkTemplate.Callback
    def entry_changed(self, widget):
        print("The entry text changed: %s" % self.entry.get_text())

The key pieces to note are:

  • Use the @GtkTemplate decorator to load the template for your widget
  • Use GtkTemplate.Child to create attributes on your widget that will be loaded from the XML file (there’s also GtkTemplate.Child.widgets(n) if you need to declare multiple widgets)
  • Use @GtkTemplate.Callback decorator to mark methods to be connected to signals as declared in the XML file

For the full demo + associated GtkBuilder XML file check out the github repo.

I’d love to see this functionality included with GTK’s python bindings, and in fact after creating this I found a bug open on the GNOME bugzilla with a patch to PyGObject to allow python users to use it, but for whatever reason it never got merged. My implementation works on the current release of PyGObject, and possibly older versions too.

Want to get rid of boilerplate in your GTK3 python application? Check out the examples/code on github.

Better python interface to mjpg-streamer using OpenCV

Friday, April 3rd, 2015

The FIRST Robotics Team that I work with decided to install two cameras on the robot, but it took awhile for us to figure out the best way to actually stream the camera data. In previous years, we had used Axis IP cameras — but this year we had USB cameras plugged into the control system. Initially we used some streaming code that came from WPILib, but it wasn’t particularly high performance. Then we heard of someone who was using mjpg-streamer, which sounded exactly like what we wanted to use!

Of course, we needed to connect to the stream from python 3. I looked around, and while there were some examples, they didn’t perform quite as well as I would have liked. I believe if you compile with OpenCV with ffmpeg, it has mjpg support builtin, but it was quite laggy for me in the past. So, I wrote a reasonably efficient python mjpg-streamer client — in particular, I partially parse the HTTP stream, and reuse the image buffers when reading in the data, instead of making a bunch of copies. It works pretty well for us, maybe you’ll find it useful the next time you need to read an mjpg-streamer stream from your Raspberry Pi or on your FRC Robot!

I’m not going to explain how to compile/install mjpg-streamer, there’s plenty of docs on the web for that (but, if you want precompiled binaries for the roboRIO, go to this CD post). Here’s the code for the python client (note: this was tested using OpenCV 3.0.0-beta and Python 3):

import re
from urllib.request import urlopen
import cv2
import numpy as np

# mjpg-streamer URL
url = 'http://10.14.18.2:8080/?action=stream'
stream = urlopen(url)
    
# Read the boundary message and discard
stream.readline()

sz = 0
rdbuffer = None

clen_re = re.compile(b'Content-Length: (\d+)\\r\\n')

# Read each frame
# TODO: This is hardcoded to mjpg-streamer's behavior
while True:
      
    stream.readline()                    # content type
    
    try:                                 # content length
        m = clen_re.match(stream.readline()) 
        clen = int(m.group(1))
    except:
        return
    
    stream.readline()                    # timestamp
    stream.readline()                    # empty line
    
    # Reallocate buffer if necessary
    if clen > sz:
        sz = clen*2
        rdbuffer = bytearray(sz)
        rdview = memoryview(rdbuffer)
    
    # Read frame into the preallocated buffer
    stream.readinto(rdview[:clen])
    
    stream.readline() # endline
    stream.readline() # boundary
        
    # This line will need to be different when using OpenCV 2.x
    img = cv2.imdecode(np.frombuffer(rdbuffer, count=clen, dtype=np.byte), flags=cv2.IMREAD_COLOR)
    
    # do something with img?
    cv2.imshow('Image', img)
    cv2.waitKey(1)


Introducing pyhcl

Wednesday, October 15th, 2014

HCL is a configuration file format created by Hashicorp to “build a structured configuration language that is both human and machine friendly for use with command-line tools”. They created it to use with their tools because they weren’t satisfied with existing solutions, and I think they did a really good job with it.

I also have similar opinions. JSON has parsers in just about any language one can think of, but is a really terrible format for humans to deal with since it doesn’t support comments. YAML is sometimes mentioned as a better choice, but I think it’s generally pretty terrible to use. I’ve only had to use YAML a few times, but in my opinion it’s tricky to get YAML files of any complexity correct without a bit of futzing.

Instead, HCL is super easy to type out and read, and looks quite nice:

variable "ami" {
    # this is a comment
    description = "the AMI to use"
}

I liked the idea of HCL a lot, so I created a python implementation of the parser using ply, which I’ve called pyhcl. When you read an HCL file, pyhcl turns it into a python dictionary (just like JSON), and the dictionary representation for the above HCL is like this:

{
  "variable": {
    "ami": {
      "description": "the AMI to use"
    }
  }
}

To get that result, parsing HCL using pyhcl is super easy, and is pretty much the same as parsing JSON:

import hcl

with open('file.hcl', r) as fp:
     obj = hcl.load(fp)

So far, I’ve been really happy with HCL, and I’ve been using it for some projects with complex configuration requirements, and the end-users of those projects have been quite happy with the simplicity that HCL provides.

pyhcl is provided under the MPL 2.0, just like the golang parser, and can mostly be used in the same places one might use JSON. It’s probably not terribly performant — but parsing files that humans read shouldn’t really require performance. If you do, python’s JSON parser is written in C and should meet your needs quite nicely.

One thing that would be nice is if there was an actual specification for HCL, and in particular it isn’t very well defined on how to convert HCL to/from JSON… but lacking that, pyhcl currently tries to match the golang implementation bug for bug, and its test suite has stolen most of the fixtures from the golang parser to ensure maximum compatibility.

Github site for pyhcl
Pypi site for pyhcl

Transparently use avro schemata (.avsc) files in a python module

Sunday, June 8th, 2014

One of the cool things about avro is that it has bindings in a couple of different languages. However, I think the only one that has native code generation support for working with avro objects is Java, which makes working with avro in the other languages a bit harder. Here’s a simple way to load your schemata dynamically (and if you don’t want to write your schemata by hand, then using maven you can generate it from AVDL files using the tip from my previous post).

What this bit of code does is overrides the __getattr__ function on the module, so anytime you try to access a type on the module, it will attempt to load the avro schema from a file of the same name with the avsc extension. To use this code, create a file called __init__.py in your directory of .avsc files, and paste the following code in.

import sys
from os.path import join, dirname
import avro.schema

class AvroSchemaLoader(object):
    '''
        This object allows us to lazily load schemata files in the current
        directory and parse them as needed.
        
        It is intended to be used as a replacement of the current module in
        sys.modules, so usage of this object should be transparent to users.
        
        For example, to access the Foo wrapper object, you would do the
        following:
        
            >>> from this_dir_name import Foo
            >>> print type(Foo)
            <avro.schema.RecordSchema at ...>
            >>>
    '''
    
    def __init__(self, module):
        # things break in odd ways if you don't keep a reference to the module here
        self.__module = module  

    def __getattr__(self, name):
        if name.startswith('__'):
            return object.__getattr__(self, name)
        
        with open(join(dirname(__file__), '%s.avsc' % name), "r") as fp:
            schema = avro.schema.parse(fp.read())
        
        setattr(self, name, schema)
        return schema


# Replace this module instance with the dynamic loader
sys.modules[__name__] = AvroSchemaLoader(sys.modules[__name__])

There’s a lot you can do to make this better — like load a wrapper around the schema instead of using the schema directly. I’ll leave that as an exercise for the reader. 🙂

Downloading and uploading dashboards to/from a graphite server

Thursday, April 24th, 2014

I’ve been using graphite and statsd lately, and over lunch quickly whipped up this script to download/upload dashboard configurations to/from a graphite server. Here’s the code, use as you wish.

#!/usr/bin/env python
#
# Author: Dustin Spicuzza
# 
# Use this script to download/upload dashboards to/from a graphite server.
#

import json

import sys
import urllib
import urllib2


download_url = 'http://%s/dashboard/load/%s'
upload_url = 'http://%s/dashboard/save/%s'


def download(ip, name, fname):
    
    uf = urllib2.urlopen('http://%s/dashboard/load/%s' % (ip, name))

    data = json.loads(urllib2.unquote(uf.read()))
    data_str = json.dumps(data['state'], sort_keys=True, indent=4, separators=(',',': '))

    if fname == None:
        print data_str
    else:
        with open(fname, 'w') as fp:
            fp.write(data_str)

    return 0


def upload(ip, name, fname):

    if fname is None:
        data_str = sys.stdin.read()
    else:
        with open(fname, 'r') as fp:
            data_str = fp.read()

    data = json.loads(data_str)

    if data['name'] != name:
        print "ERROR: dashboard name doesn't match name in state file"
        return 1

    post_data = urllib.urlencode([('state', json.dumps(data))])

    request = urllib2.Request(upload_url % (ip, name), post_data)
    request.add_header("Content-type", "application/x-www-form-urlencoded")

    print urllib2.urlopen(request).read()
    return 0


def usage():
    print "Usage: dasher.py [upload graphite_host name filename] | [download graphite_host name [filename]]"
    exit(1)

if __name__ == '__main__':

    if len(sys.argv) < 4:
        usage()

    action = sys.argv[1]
    ip = sys.argv[2]
    name = sys.argv[3]
    fname = None

    if len(sys.argv) > 4:
        fname = sys.argv[4]

    if action == 'upload':
        retval = upload(ip, name, fname)

    elif action == 'download':
        retval = download(ip, name, fname)

    else:
        usage()

    exit(retval)

Award Winning FIRST Robotics Robot Control Interface

Monday, April 8th, 2013

KwarqsDashboard is an award-winning control system developed in 2013 for FIRST Robotics Team 2423, The Kwarqs. For the second year in a row, Team 2423 won the Innovation in Control award at the 2013 Boston Regional. The judges cited this control system as the primary reason for the award.

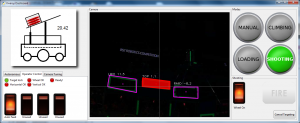
It is designed to be used with a touchscreen, and robot operators use it to select targets and fire frisbees at the targets. Check out the shiny screenshot below:

Kwarqs Dashboard ScreenshotThere are a lot of really useful features that we built into this control interface, and once we got our mechanical and electrical bugs ironed out the robot was performing quite well. We’re looking forward to competing with it at WPI Battle Cry 2013 in May!  Here’s a list of some of the many features it has:

  • Written entirely in Python
    • Image processing using OpenCV python bindings, GUI written using PyGTK
    • Cross platform, fully functional in Linux and Windows 7/8
  • All control/feedback features use NetworkTables, so the same robot can be controlled using the SmartDashboard instead if needed
    • SendableChooser compatible implementation for mode switching
  • Animated robot drawing that shows how many frisbees are present, and tilts the shooter platform according to the current angle the platform is actually at.
  • Allows operators to select different modes of operation for the robot using brightly lit toggle switches
  • Operators can choose an autonomous mode on the dashboard, and set which target the robot should aim for in modes that use target tracking
  • Switches operator perspective when robot switches modes
  • Simulated lighted rocker switches to activate robot systems
  • Logfiles written to disk with errors when they occur

Target acquisition image processing features:

  • Tracks the selected targets in a live camera stream, and determines adjustments the robot should make to aim at the target
  • User can click on targets to tell the robot what to aim at
  • Differentiates between top/middle/low targets
  • Partially obscured targets can be identified
  • Target changes colors when the robot is aimed properly

Fully integrated realtime analysis support for target acquisition:

  •  Adjustable thresholding, saves settings to file
  • Enable/disable drawing features and labels on detected targets
  • Show extra threshold images
  • Can log captured images to file, once per second
  • Can load a directory of images for analysis, instead of connecting to a live camera

So, as you can see, lots of useful things. We’re releasing the full source code for it under a GPL license, so go ahead, download it, play with it, and let me know what you think! Hope you find this useful.

A lot of people made this project possible:

  • Some code structuring ideas and PyGTK widget ideas were derived from my work with Exaile
  • Team 341 graciously open sourced their image processing code in 2012, and the image processing is heavily derived from a port of that code to python.
  • Sam Rosenblum helped develop the idea for the dashboard, and helped refine some of the operating concepts.
  • Stephen Rawls helped refine the image processing code and distance calculations.
  • Youssef Barhomi created image processing stuff for the Kwarqs in 2012, and some of the ideas from that code were copied.

The included images were obtained from various places:

  • Linda Donoghue created the robot image
  • The fantastic lighted rocker switches were created by Keith Sereby, and are distributed with permission.
  • The green buttons were obtained via google image search, I don’t recall where

Download it on my FRC resources page!

Problems with file descriptors being inherited by default in Python

Wednesday, February 6th, 2013

Have you ever run into a traceback that ends with something like this?

  File "C:\Python27\lib\logging\handlers.py", line 141, in doRollover
    os.rename(self.baseFilename, dfn)
WindowsError: [Error 32] The process cannot access the file because it is being used by another process

I certainly have, in a few places. The basic problem is that when python creates file objects on Windows (and I think on *nix as well), by default Python will mark the handle as being inheritable (I’m sure there’s a reason why… but, doesn’t make a whole lot of sense for this to be the default behavior to me). So if your script spawns a new process, that new process will inherit all the file handles from your script — and of course since it doesn’t realize that it even has those handles, it’ll never close them. A great example of this is launching a process, then exiting. When you launch your script again and try to open that handle… the other process still has it open, and depending on how the file was opened, you may not be able to open it due to a sharing violation.

It looks like they’re trying to provide ways to fix the problem in PEP 433 for Python 3.3, but that doesn’t help those of us still using Python 2.7. Here’s a snippet that you can put at the very beginning of your script to fix this problem on Windows:

import sys

if sys.platform == 'win32':
    from ctypes import *
    import msvcrt
    
    __builtins__open = __builtins__.open
    
    def __open_inheritance_hack(*args, **kwargs):
        result = __builtins__open(*args, **kwargs)
        handle = msvcrt.get_osfhandle(result.fileno())
        windll.kernel32.SetHandleInformation(handle, 1, 0)
        return result
        
    __builtins__.open = __open_inheritance_hack

Now, I admit, this is a bit of a hack… but it solves the problem for me. Hope you find this useful!

Drawing in color in PyGTK

Monday, October 15th, 2012

I’ve been playing with drawing on your own widgets in PyGTK on Windows, and I found it incredibly difficult to figure out how to draw something in color on a gtk.gdk.Drawable object using draw_line, draw_rectangle, etc. You can’t just set the color using the semi-obvious mechanism:

    gc = widget.window.new_gc()
    gc.set_foreground(gtk.gdk.Color(255,0,0))

I think the reason it doesn’t work is because if the color isn’t in the device-specific colormap, then GTK will ignore whatever color you set without bothering to warn you that something is wrong. However, I’ve finally hit on something that works. In your expose event (or elsewhere), you can put in something like the following:

    def on_expose_event(self, widget, event):

        gc = widget.window.new_gc()
        colormap = self.gc.get_colormap()
        color = colormap.alloc_color('yellow')
        gc.set_foreground(color)

        # whatever gtk.gdk.Drawable draw_* functions you call here
        # will use that color

Hope you find this useful!